The original PiCorder worked, took ages to start recording and I couldn't hear what I was recording as it was being recorded, it was time for a rethink.
I decided to throw away the original idea and add a small USB sound card, this is what I got in all for it, apart from the Raspberry Pi Zero W of course.
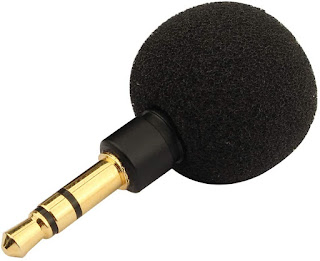
These are fantastic, reversible USB micro leads, not USB C, USB micro, they can go in either way around.This is the mic I got, again from Amazon, £7.59, you can probably use any mic with a 3.5mm jack, I didn't have one so this did the job.
Nice little case for it all to go in, as it's transparent you can use the onboard LED as a sort of status thingy, Amazon again and £8.99
You don't have to get one of these but in my mind it makes the sound card fit better with the case. Cost for the two is £5.10 from Amazon.
Now we remove the bluetooth software
sudo systemctl disable hciuart.service
sudo systemctl disable bluealsa.service
sudo systemctl disable bluetooth.service
sudo apt-get purge bluez -y
sudo apt-get autoremove -y
Now reboot to continue, once it's back up you should find a press of the top button will shut the Pi down and once it's closed down completely the status lights on the charger will go off. Press the test button on the charger and the Pi will come back on.
I've made a small script called mtbootme which is in the bin folder, makes it easier to add things when it boots up, just run sudo nano /bin/mtbootme and add the following lines
# Turns the light off
echo 0 >/sys/class/leds/led0/brightness
# Makes the light flash
echo heartbeat >/sys/class/leds/led0/trigger
Save it and make it executable with sudo chmod +x /bin/mtbootme
Now we need a way of recording the sound and also of being able to monitor it while it's recording. There's probably a better way of doing it but I came up with this, there's about a second delay.
The bit of shell script I use checks for a file number, if it's not there it starts at 1, if it is there it adds a 1 to it.
sudo nano /bin/mtcapture
Paste this lot in
#!/bin/bash
# shuts down the wifi
ifconfig wlan0 down
# Turns the LED on fully
echo 0 >/sys/class/leds/led0/brightness
echo 1 >/sys/class/leds/led0/brightness
# sorts the file number
FILE=/share/filenum
if [ -f "$FILE" ]; then
echo "$FILE exists."
else
echo "$FILE does not exist."
echo "0"> /share/filenum
fi
read newfile < /share/filenum
echo $newfile
newfile=$((newfile+1))
echo $newfile > /share/filenum
# Records the noises
arecord -f cd - | tee /share/AudioTux1-$newfile.wav | aplay - &
echo $newfile
# updates the file number
echo $newfile > /share/filenum
Make it executable with sudo chmod +x /bin/mtcapture
That's how we start it recording, don't run this just yet as it will turn the wifi off and you'll lose your connection or rem out the wifi line while testing.
Now we do the stop recording file
sudo nano /bin/mtstop
#!/bin/bash
# Kill all recording services
pkill mtcapture
pkill mtcapture
pkill arecord
pkill aplay
# Starts up the wifi
ifconfig wlan0 up
# Flashes the green light so we know recording has stopped
echo 0 >/sys/class/leds/led0/brightness
echo heartbeat >/sys/class/leds/led0/trigger
Save it and make it executable again with sudo chmod +x /bin/mtstop
A bit of python now to monitor the stop start button.
sudo nano record.py
This lot goes in here.
# !/bin/python
import RPi.GPIO as GPIO
import time
from subprocess import call
import os
GPIO.setmode(GPIO.BCM)
GPIO.setup(13,GPIO.IN,pull_up_down=GPIO.PUD_UP)
flag = False
while True:
input = GPIO.input(13)
if(input == False):
if(flag == False):
os.system("/bin/mtcapture")
flag = True
time.sleep(0.4)
else:
os.system("/bin/mtstop")
flag = False
We don't need to make this executable to run it.
Finally we edit the rc.local file to get things working on startup
sudo nano /etc/rc.local
Add these two lines just before the exit 0 at the bottom
python2 /root/record.py &
/bin/mtbootme &
Save it and reboot and you're ready to go, one last thing I've done is to install samba so I can pull the files off it. All the recordings are saved in the directory /share.
Install Samba and MC, it's one of the first things I install as it makes navigating the structure and editing really easy.
sudo apt install samba mc
Once done edit the samba config file
sudo nano /etc/samba/smb.conf
Add this to the bottom[Shares]
path = /share
public = yes
browseable = yes
writeable = yes
delete readonly = yes
force create mode = 777
force directory mode = 777
writeable = yes
directory mode = 777
create mode = 777
Save it and restart samba with sudo service smbd restart
And you are now ready to go, once you've powered it up the green status LED should be flashing, plus some headphones into the socket and press the lower button and it should start recording, you'll hear a delayed sound in the headphones, press it again and it will stop.
It's not supposed to be a professional bit of equipment, it's small, it's light and it sort of works and more than anything it's a bit of fun and it will get you more involved with nature.
Advantages of the funnel at the end are that it's completely collapsible, you can put it in a pocket and fold it over as shown below and it still works. Disadvantages are that you look like a mad professor when you're out and about with it.
 |


No comments:
Post a Comment